Download the Mitutoyo MICSYS Image Correlation System product literature using the link below:
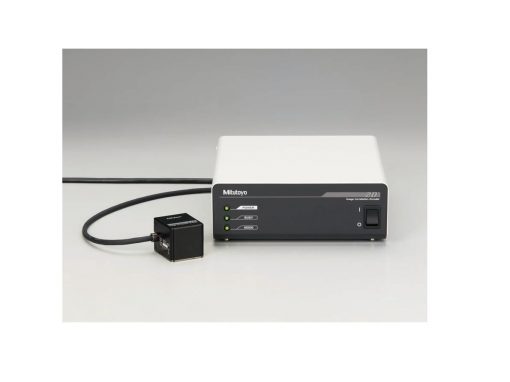
Mitutoyo MICSYS Image Correlation System (549-701A)
$8,585.00
Mitutoyo America Corporation MICSYSTM
Mitutoyo Image Correlation System a non-contact position measurement system designed to measure displacement simultaneously in X and Y axes at the nanometer level. There is no scale required for this device, just an optically rough surface (metal, ceramic, silicon…) making it ideal for semiconductor wafer placement applications and precision manufacturing applications that must meet the most stringent specifications. Easy alignment and portability makes the MICSYS a flexible tool when traditional laser heads and receivers are not practical.
Standard configuration: Detector, I/F unit, Head cable, Sample software for data correlation, Standard target
Read More
Mitutoyo MICSYS Image Correlation System Features:
- Range ± 100 µm (2D)
- Resolution 1 nm (1σ)
- Repeatability (at 20°) 5 nm (1σ)
- Accuracy (at 20°) ± 100 nm
- Thermal Drift <80 nm/°C
- Update Rate 20 Hz
- High accuracy non-contact 2D encoder using image correlation.
- Simultaneous X-Y position measurements.
- Order# 549-701A
The operating principal of the MICYSYS system utilizes image correlation to detect displacement of a reference image as it moves from a starting point through X-Y to a new end position - the displacement resulting from movement of the surface under scrutiny. In detail: a collimated laser beam is projected onto a target surface that is itself attached to the underlying artifact to be measured (the artifact being, for example, a prototype structural beam under consideration in the design of a high-precision machine tool). The projected laser generates a speckle image on the target that is detected by a CMOS camera. Next, a variable being studied is introduced: for example, the temperature of the beam is increased. Depending on the beam's coefficient of expansion this results in some degree of movement. This movement causes the target and its associated speckle image to displace in 2D to a new position. Digital signal processing algorithms analyze the new view, recognizing the shift of the reference speckle image from its original position to its new position. Algorithms then calculate the 2D displacement of the target in the plane of the measurement surface. In its present form, the sensor is capable of sub-nanometer position noise and X-Y measurements over a 250µm X 250µm measurement range.
An important advantage of using a speckle sensor is that it does not require a calibrated scale - any less-than-optically smooth surface can be measured. There are many manufacturing, engineering and materials R&D applications for the MICSYS system, including, but not limited to: relaxation/deformation of materials and structural member designs over time; changes due to thermal effects; monitoring of stage drift and drift of mounting and fixturing systems; nanometer monitoring of workpiece placement; actuator creep/slippage/ hysteresis; measurement of the repeatability of tool change and other servo-robotic systems.
Measuring principle
System Configuration
When the rough surface of an object is irradiated by a laser beam, the beam is scattered into multiple reflected beams that, due to the coherent nature of laser radiation, interfere with each other to form a particular kind of reflection called a speckle pattern. Now, if the object is moved, the speckle pattern image is also moved in proportion, and this effect can be used to track the 2D displacement of the object at the nanometer resolution level by comparing the speckle images obtained before and after the movement (image correlation).


